

DIY Macramé Plant Hanger: Step-by-Step Tutorial for 2025
Welcome to CraftyFyHub, your ultimate crafting blog as of Friday, May 23, 2025! Today, we’re diving into one of the trendiest crafting ideas of the year: a DIY macramé plant hanger. This macramé tutorial will guide you through creating a stunning handmade plant hanger that’s perfect for adding a boho touch to your home. Whether you’re a beginner or an experienced crafter, this macramé plant hanger project is easy, fun, and functional. Let’s get started with this step-by-step guide to elevate your space with macramé plant hangers in 2025!
Why Choose a Macramé Plant Hanger?
Macramé plant hangers are a perfect blend of style and sustainability, making them a top choice for crafting ideas in 2025. Using simple knots, you can create a handmade plant hanger that showcases your creativity while displaying your favorite plants. Searches for DIY plant hangers have surged by 40% this year, reflecting their popularity among home décor enthusiasts. At CraftyFyHub, we’re here to help you master this macramé tutorial with clear instructions and visuals for each step.
Why This Macramé Tutorial Works for Everyone
This macramé tutorial is designed for all skill levels. Beginners will appreciate the simplicity of square knots, while experienced crafters can experiment with variations. Macramé plant hangers are also budget-friendly, requiring minimal materials for maximum impact. Plus, they make great gifts—imagine gifting a handmade plant hanger for a housewarming in 2025!
Benefits of a Handmade Plant Hanger
Eco-Friendly: Made with natural cotton cords, reducing environmental impact.
Customizable: Add beads or dye the cords for a personalized macramé plant hanger.
Relaxing: The knotting process is meditative, perfect for unwinding on a Friday night.
Materials You’ll Need
Before we start, gather these supplies for your DIY plant hanger:
4mm cotton cord (19 meters)
A wooden or metal ring (5 centimeters in diameter)
'S' hook for hanging while creating(this is optional- you can easily hang the ring on any handle like I did (see pictures below))
Scissors
Measuring tape
A small plant pot

Step-by-Step Instructions for Your Macramé Plant Hanger
Follow these steps to create your macramé plant hanger. Each step includes an image for visualization.
Step 1: Cut and Attach the Cords
Cut eight pieces of cord, each 230 centimeters long, and another 60 centimeter long cord. Fold each cord in half and loop it through the ring using a Lark’s Head Knot. Follow the numbered steps in the image below to tie the knot: (1) Fold each cord in half, (2) Place each loop over the ring, (3) Pull the cord ends through the loop, and tighten to form the knot. You’ll have 16 strands hanging evenly from the ring- excluding the 60 centimeter cord, which we will use in the later steps.
LARK'S HEAD KNOT

Step 2: Create the First Set of Square Knots
Divide the 16 strands into four groups of four strands each.
Follow the steps below to tie a square knot.
Step 1:
To tie a square knot, take the two outer strands of a group, cross the left (red) over the middle two (green) and pass it over to the right side.
Step 2:
Now, take the cord on the right side (blue) place it above the red cord, then pass it beneath the two middle cords (green). Then, pull the blue cord from under the red cord all the way and tighten by pulling the two cords (red, blue) together all the way to the top.
Step 3:
The red cord should now be on your right and the blue to the left. Now place the cord on the right (red) over the two middle cords and pass it over to the left side.
Step 4:
Take the cord on the left side (blue) and place it above the red cord, then pass it beneath the two middle cords (green). Then pull the blue cord from under the red cord all the way and tighten the knot by pulling the two cords (red, blue) together all the way to the top.
THIS MAKES ONE SQUARE KNOT.

Make square knots with the rest of the 12 cords. You will have 4 square knots in total.

Leaving two cords from the left and two from right side, make square knots with the remaining 12 cords (3 in total). In the next line, leave two cords (each of which are from the left and right side) thus making two square knots. Finally, leave two cords each from left and right side leaving behind only 4 cords for a square knot.

This time, we will be adding the cords two at a time from the left and right, and increase the square knots to a max of four in total as we proceed to the next set of square knots.

Finally, we will once again decrease the cords - two from each side - making 3 square knots, then 2 knots and ultimately 1 square knot.

Step 3: Form the Basket Structure
Measure 25 inches below the last square knot. Take two cords from right side and two cords from the left side, and make a square knot. Repeat this by making a square knot with two cords remaining from the previous square knot and taking two cords from the adjacent knot, making four square knots at he same length.
About 8 centimeters below these square knots, make another round of square knots by taking two cords from adjacent knots and make 4 square knots in total. This will create a net-like structure for the pot.


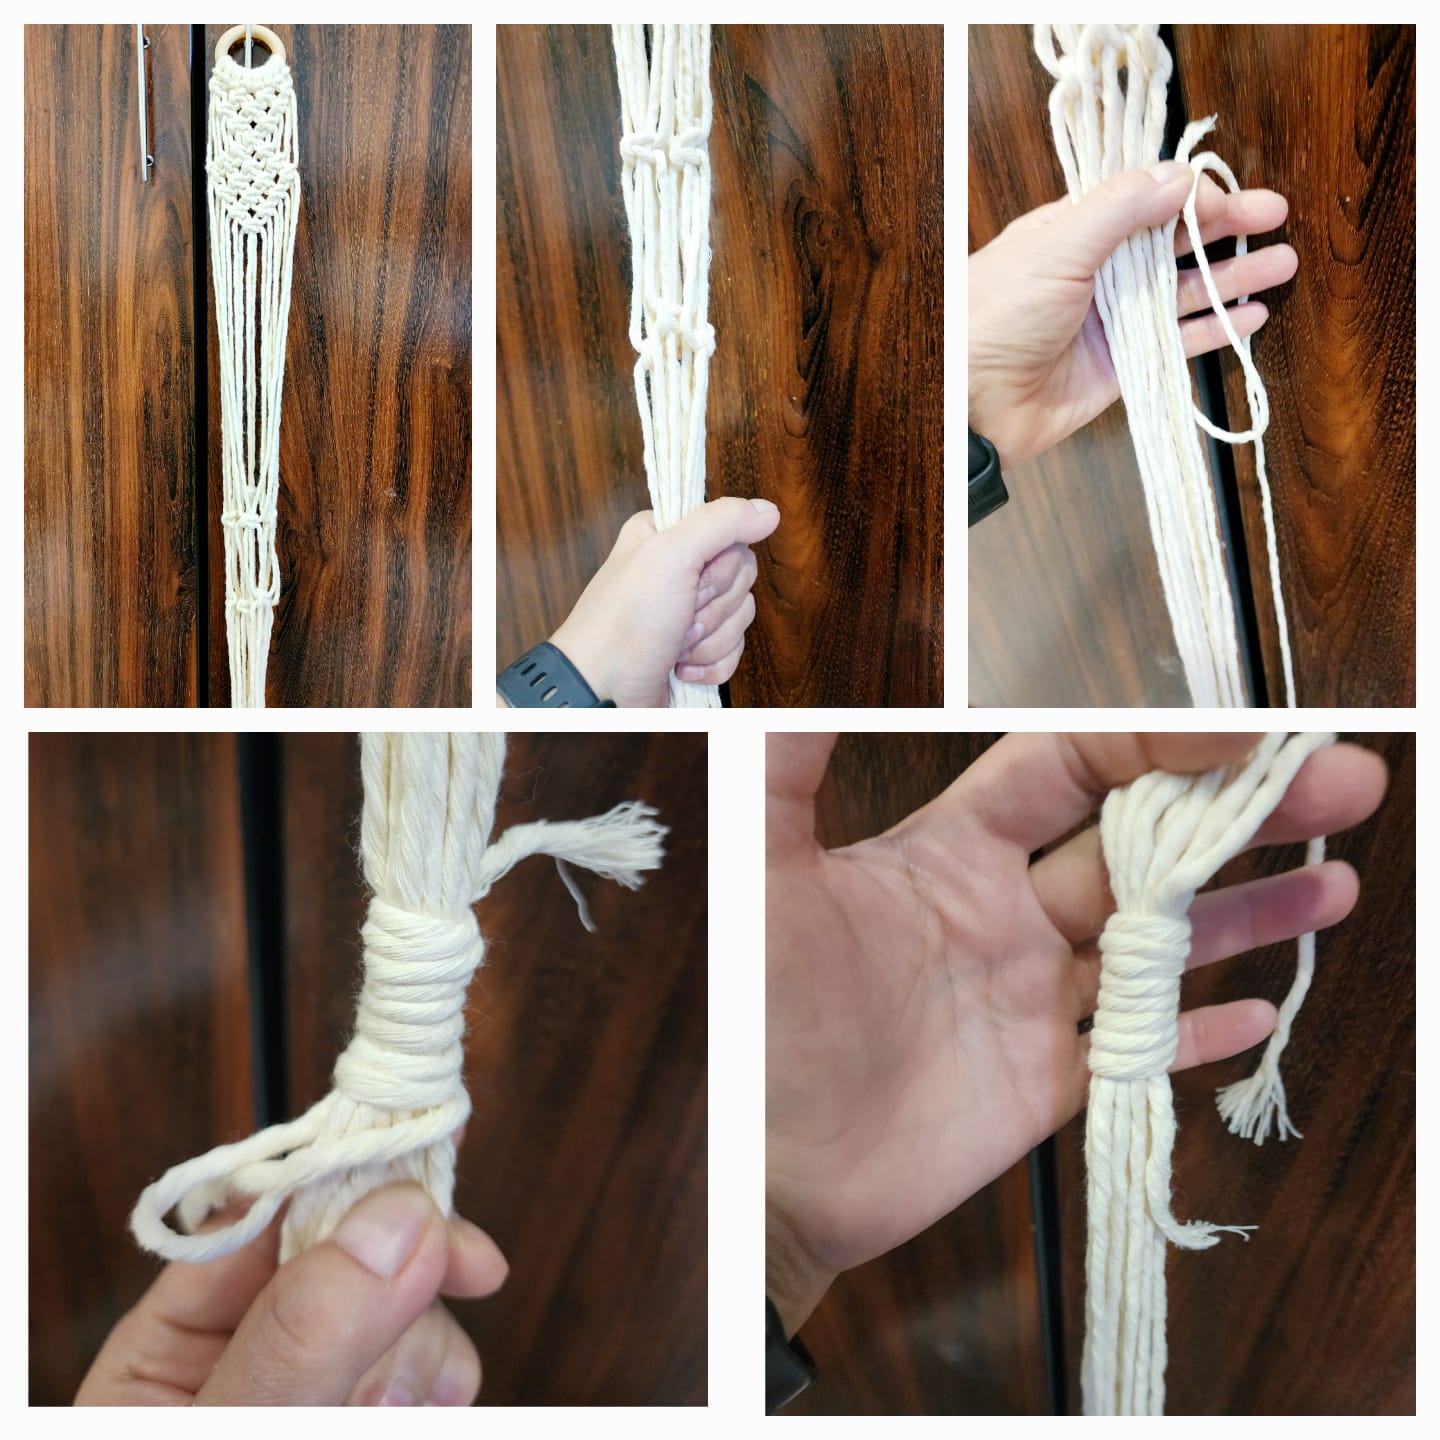
Step 4: Secure the Base
Measure 5 centimeters below the second set of knots. Gather all 16 strands and tie them with a gathering knot. For this, use the 60 centimeters cord that we cut in step 1. Make a loop at one end of the cord.
Place it 5 centimeters below the knots with the loop pointing down and the longer end towards your right side, if you are a right handed person (for a left handed person keep the longer cord on the left). Now, with the longer cord end, wind it tightly around all 16 cords and the loop, till you have only about a centimeter of the loop remaining, or the cord you are winding remains only about 2 centimeters (such was my case).
Put the cord (that you just wound around) through this loop and pull the shorter cord of the loop at the top of the gathering knot. The loop should disappear into the gathering knot. Cut the two cords of the gathering knot, and your plant hanger is ready! Leave the remaining cords as a tassel, or trim them for a neater look by cutting them all at the same length.
Step 5: Add Your Plant and Hang
Place your plant pot into the hanger, ensuring it sits securely in the net structure. Hang your macramé plant hanger from a hook or ceiling, adjusting the cords as needed for balance.

Tips to Customize Your DIY Plant Hanger
Add Beads: Thread wooden beads onto the cords before tying knots for a decorative touch.
Dye the Cords: Use natural dyes to create a colorful handmade plant hanger.
Experiment with Length: Adjust the cord length to make a longer or shorter macramé plant hanger.
---
Join the CraftyFyHub Community
We’d love to see your DIY plant hanger! Share your creation in our CraftyFyHub community gallery. Comment below with your favorite crafting ideas or tips for macramé plant hangers—we’re excited to hear from you!


0 Comments